
Flower Garden Path Tutorial //Block #5 // Summer Sampler Series

Flower Garden Path Quilt Block Tutorial, Summer Sampler Series, swimbikequilt.com
Welcome to the fourth installment of the Summer Sampler Series—this is the Flower Garden Path Quilt Block Tutorial. Are you having fun? I know that I am!
Note: A paper pieced version of this block will be posted on March 10, 2021.
I have loved seeing everyone's blocks in the flickr pool. Today's block is referred to in Barbara Brackman's Encyclopedia of Pieced Quilt Patterns as Flower Garden Path. [In the Farmer's Wife book (and quilt-a-long), the block is referred to as Garden Path, while Flower Garden Path is made up of the same sub-blocks, but arranged differently).
Flower Garden Path is categorized as a four patch block, or four equal squares organized in a two by two grid alignment. Four patch blocks are some of the most commonly used blocks, and are often subdivided. With this block, there are 9 (!) units in each four patch, which makes this a (gasp) 36 patch block. I think that half of the quilts I make have less blocks and seams than this 12-1/2’’ x 12-1/2’’ (unfinished) block. But this is what this series is all about, right? Trying something new, making sampler blocks that you wouldn't necessarily want to make a whole quilt out of, and skill-building.

Flower Garden Path
Quilt Block Tutorial
Flower Garden Path's construction is actually straightforward; it is made up entirely of half square triangles (HSTs) with one square in the center.
Cutting
Royal Blue Print:
(10) 3’’ x 3’’ squares
(1) 2-1/2’’ x 2-1/2’’ square
Light Blue Print(s)
(1) 2-1/2’’ x 2-1/2’’ square
(1) 3’’ x 3’’ square
note: if you want (2) scrappy triangles in the “red quadrant”, then cut (2) 3’’ x 3’’ squares out of two different prints, instead of the one square noted above
White:
(14) 3’’ x 3’’ squares
(1) 4-1/2’’ x 4-1/2’’ square [center square]
Red Print(s):
(1) 2-1/2’’ x 2-1/2’’ square
(1) 3’’ x 3’’ square
note: if you want (2) scrappy triangles in the “red quadrant”, then cut (2) 3’’ x 3’’ squares out of two different prints, instead of the one square noted above
Green Print(s)
(1) 2-1/2’’ x 2-1/2’’ square
(1) 3’’ x 3’’ square
note: if you want (2) scrappy triangles in the “red quadrant”, then cut (2) 3’’ x 3’’ squares out of two different prints, instead of the one square noted above
Yellow Print(s)
(1) 3’’ x 3’’ square
note: if you want (2) scrappy triangles in the “red quadrant”, then cut (2) 3’’ x 3’’ squares out of two different prints, instead of the one square noted above
Piece the HST Units
Piece the Half Square Triangle (HST) Units
Draw a diagonal line from corner to corner on each of your (14) White 3’’x 3’’ squares.
Place (1) White 3’’ x 3’’ square right sides together with (1) Royal Blue 3’’ x 3’’ square. Sew the pair together, stitching 1/4’’ away from each side of the drawn line.
Cut apart along the drawn line to make (2) HST units. Press triangles open, or towards the Royal Blue.
Trim the HST unit to 2-1/2’’ x 2-1/2’’, using your ruler to keep the diagonal in line across the square.
Repeat steps 1-4 to finish sewing your HST Units together:
(10) Royal Blue and (20) White squares, for a total of (20) Royal Blue/White HST pairs.
(1) Yellow (1) White square, for a total of (2) Yellow/White HST pairs.
(1) Green and (1) White square, for a total of (2) Green/White HST pairs.
(1) Red and (1) White square, for a total of (2) Red/White HST pairs.
(1) Light Blue and (1) White square, for a total of (2) Light Blue/White HST pairs.
Piece the Flower Garden Path Block

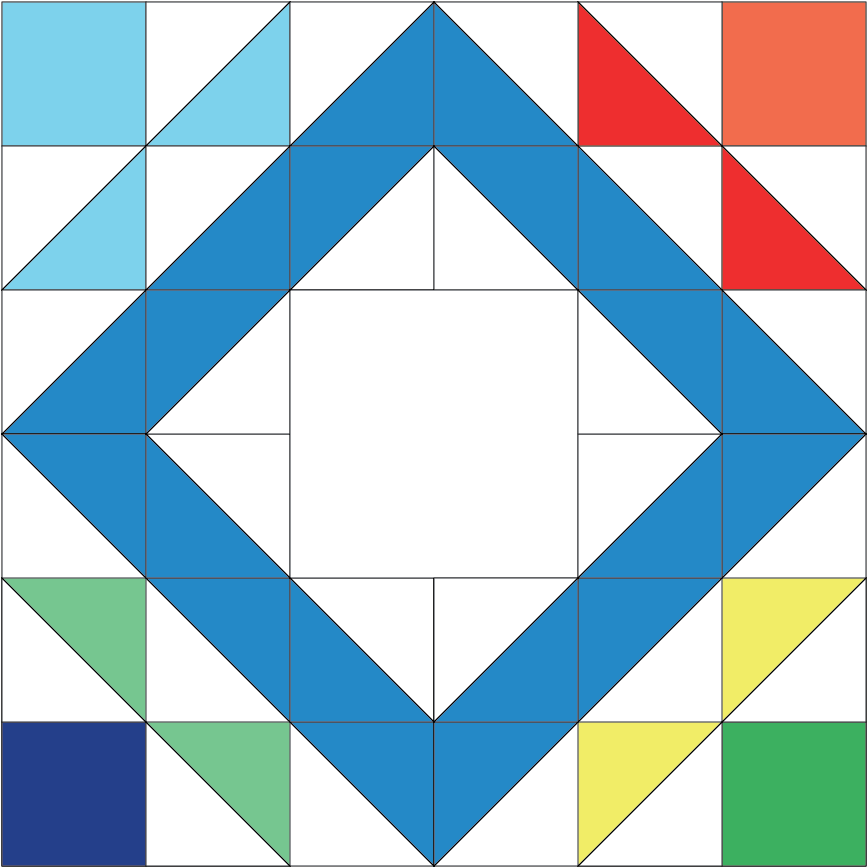
1. Lay out your quilt block according to the diagram.
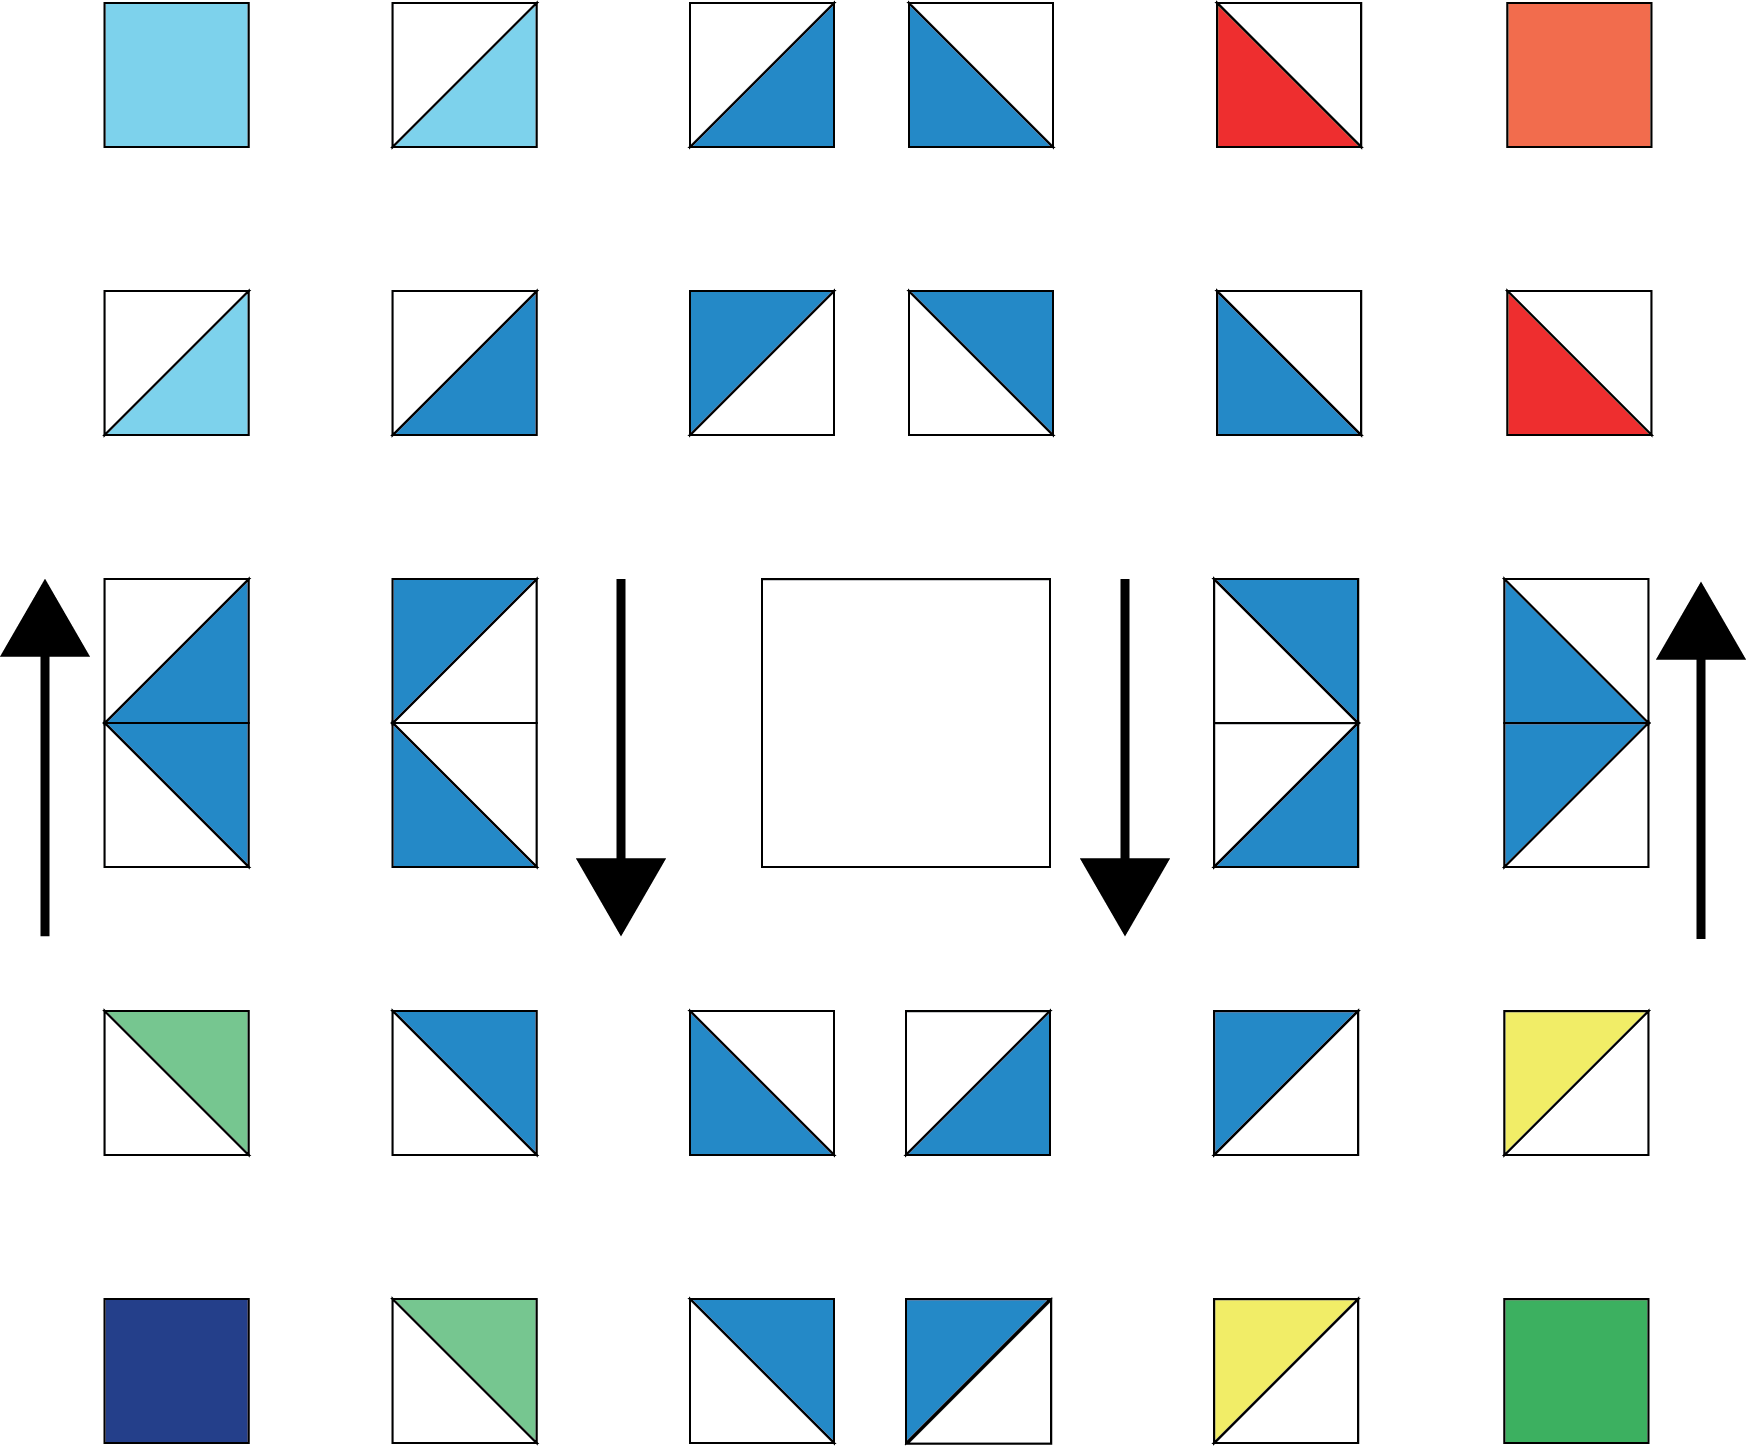
2. Piece the Royal Blue/White HSTs in the two center horizontal rows, refer to the diagram. Place the HST units right sides together, pin, and sew. Press open, or follow the arrows and press the outer HST units up, and the inner HST units down.

3. Sew the quilt block together in rows. Place units right sides together, pin, and sew. Press the seams open, or follow the arrows and press Rows 1, 3, and 5 to the left, and Rows 2 and 4 to the right.

4. Sew the rows together—pin, sew, and press open, or to one side. Ta da! It is finished.
